Discover how EvolutivoFW can help you turn your emails into leads, giving your marketing and sales efforts a significant boost. Whether you're a seasoned marketer or a business owner, read on to unlock the potential of your email communication.
This past month I received an interesting question from one of our users. A question that I have seen and answered before but that brought me to thinking about answering it again in the light of the functionality and options we have today.
The question is:
Currently, I manage information requests through a WordPress tool, but it doesn't integrate directly with EvolutivoFW, which is causing us some complications. The current EvolutivoFW forms, to be honest, are not very aesthetically pleasing. So what we need is to be able to process an email that, when received, automatically converts the identified records into a lead within the application.
Fair enough, let's see what options we have.
Webforms
The Webforms extension in EvolutivoFW offers a straightforward method to create customizable forms that can be easily embedded into your website. These forms can automatically create leads within the application. To set up a webform, go to Settings > Module Manager > Webform. Here, you can configure essential settings like the public ID, web domain, and the fields you want to include in the form.
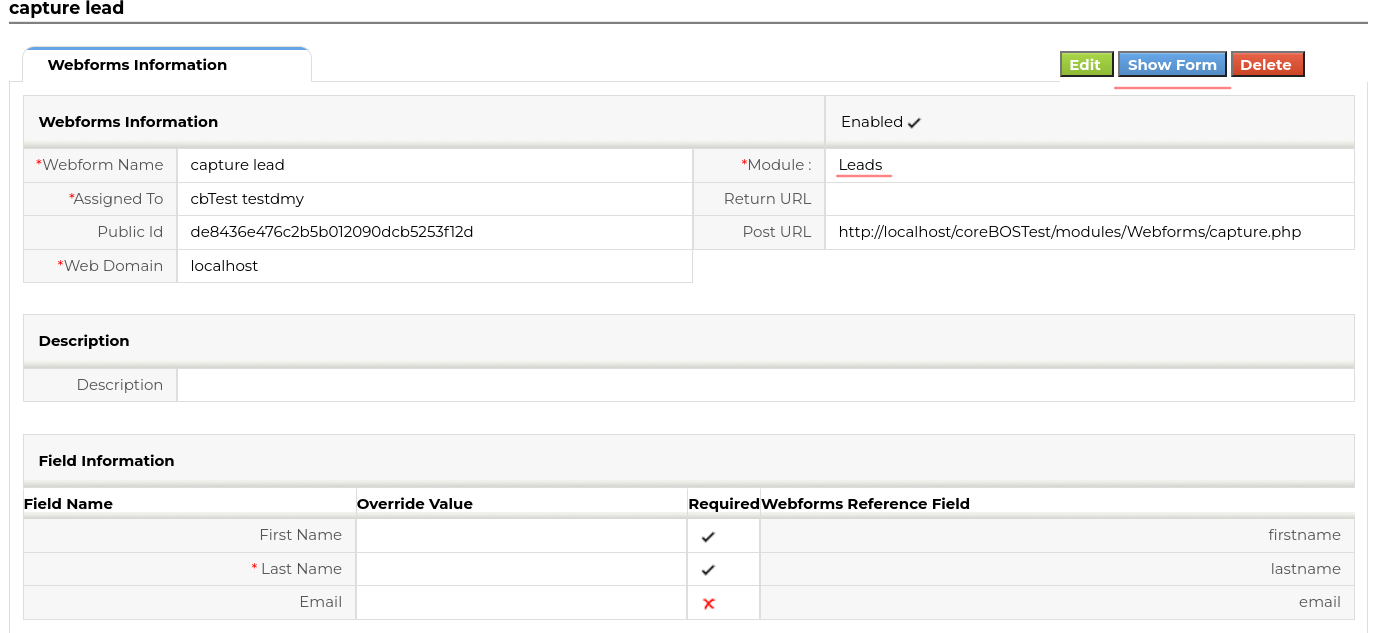
Public ID is a check to validate the origin of your data and try to reduce spam (not very effective, but...), the web domain is a better protection mechanism as it will ask the web server for the origin website of the form and only accept those that come from a domain in this field.
Once you have defined all that and you click on the "Show Form" button you will get some code like this:
<form name="capture lead" action="http://localhost/EvolutivoFW/modules/Webforms/capture.php" method="post" accept-charset="utf-8">
    <input type="hidden" name="publicid" value="de8436e476c2b5b012090dcb5253f12d" />
    <input type="hidden" name="name" value="capture lead" />
    <input type="hidden" name="moduleName" value="Leads" />
    <p> <label>First Name</label> <input type="text" value="" name="firstname" required="true"> </p>
    <p> <label>Last Name</label> <input type="text" value="" name="lastname" required="true"> </p>
    <p> <label>Email</label> <input type="text" value="" name="email"> </p>
    <p> <input type="submit" value="Submit" /> </p>
</form>
This is the bare minimum you need to get the Lead created. You must construct on top of this to add the styling of your website, but you can also do it the reverse. Let's imagine that you are using WordPress with some plugin to construct forms. You can use that plugin to add the fields above and submit the form to the URL indicated there. In other words, you have there all the information you need to create a lead from a form, no matter where or how that form is created and shown.
The security considerations of this webform are many, it is much like an open door to your application, which is why we created other options. Before moving on I would like to share this forum post which adds an extra layer of protection to the webform extension.
Web service webforms
As I just described in the previous option, the webform extension is opening an endpoint service for any website code to send a form there and get a lead created. The coreBOS Webservice Webform extension takes that concept further by providing a secure endpoint for submitting form data. This extension uses the web service API for enhanced security and supports the creation of multiple entities simultaneously, such as leads, contacts, and opportunities. So, for example, you will be able to create a contact and a business opportunity in the same form submission.
This is explained very well in the manual and there are examples in the repository so I am not going to dedicate more time to it.
You can find the code in this GitHub repository: tsolucio/coreBOSwsWebform: coreBOS advanced webform creation and validation
Mail converter
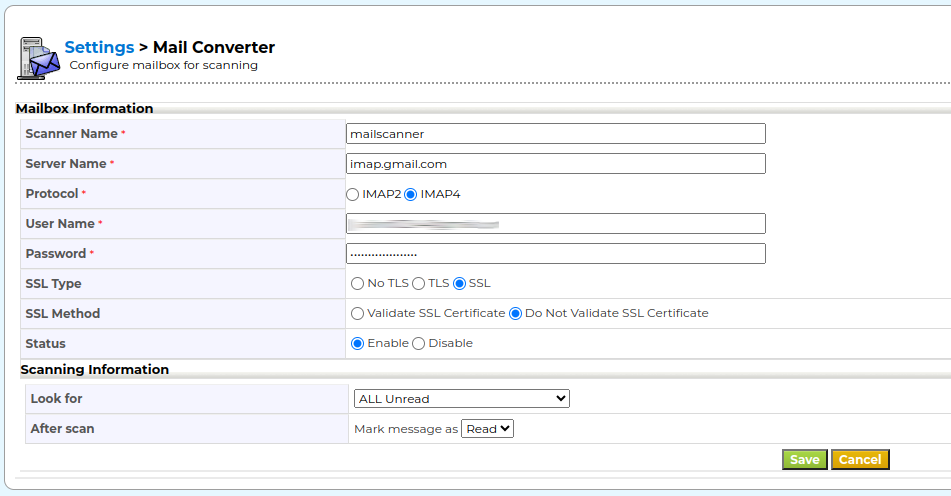
Mail Converter is an extension that permits the application to read an email account and do some actions on each email that arrives. It was created to manage the flow of conversation on a support ticket at a time when the solutions were very limited in scope. I mean, instead of focusing on the real problem and creating a solution as generic as possible to cover many use cases as we do today, they were creating specific solutions for specific problems. You can read about the Mail Converter functionality here.
In May 2022 we extended the Mail Converter functionality to permit triggering a workflow when an email is read. This opens a whole world of possibilities. All of a sudden you can convert the email into an SMS, or a message to mattermost, calculate sentiment analysis and raise a notification, or... create a lead. Let's see how we could do that.
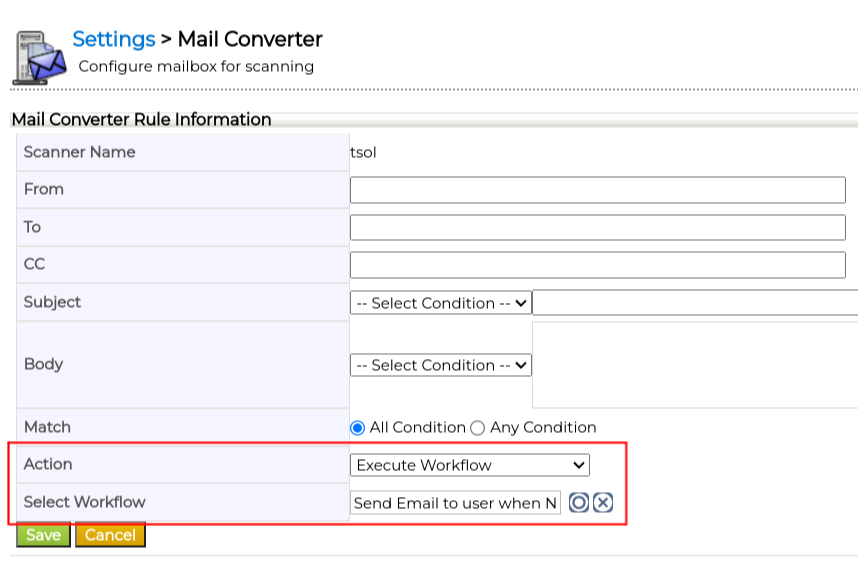
When a workflow is launched from Mail Converter the email being processed is loaded into the context with these variables:
- IncomingMail_To
- IncomingMail_From
- IncomingMail_Body
- IncomingMail_CC
- IncomingMail_BCC
- IncomingMail_ReplyTo
- IncomingMail_MessageID
- IncomingMail_Date
- IncomingMail_Subject
This means that we can use the expression getFromContext('IncomingMail_To') to get the email address of the person the email has been sent to or getFromContext('IncomingMail_Body') to get the body of the email.
The source of the email
It's essential to consider the source of the email or form submissions. Ensure that the tool you use generates data in a format that is easily processed by EvolutivoFW. Choosing the right extension to adapt form submissions to the application's expectations can save you time and effort.
Let's suppose that we are getting an email that looks like this:
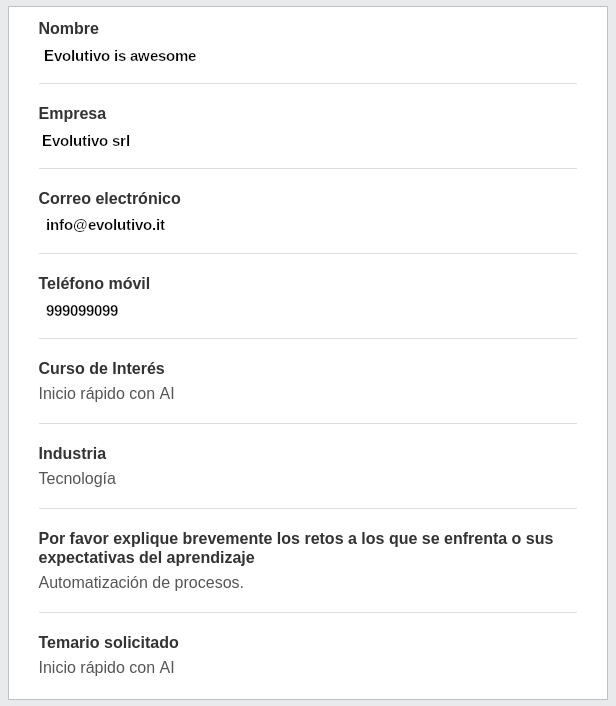
This email appears well-designed for a salesperson responsible for initiating a sales process. However, when we examine the variable IncomingMail_Body, we find a significant amount of embedded HTML code. The necessary information is buried within layers of HTML, making it extremely challenging for a computer to process. Here is an excerpt of the HTML where the name is located:
<tr>
    <td
    style="color:#333333;padding-top:
    20px;padding-bottom:
    3px;"><strong>Nombre</strong></td>
</tr>
<tr>
    <td
    style="color:#555555;padding-top:
    3px;padding-bottom:
    20px;">Evolutivo is awesome</td>
</tr>
This section is preceded by 260 lines of HTML. In this case, there is also a text version of the email, which is somewhat easier to parse:
*Nombre*
Evolutivo is awesome

*Empresa*
Evolutivo srl

*Correo electrónico*
info@evolutivo.it

*Teléfono móvil*
999099099

*Curso de Interés*
Inicio rápido con AI

*Industria*
Tecnología

*Por favor explique brevemente los retos a los que se enfrenta o sus
expectativas del aprendizaje*
Automatización de procesos.

*Temario solicitado*
Inicio rápido con AI
While we can parse this text version, it is essential to note that if the email-sending tool is configured to send emails in plain text, without HTML, and in a computer-friendly format, it would be far more efficient and easier. For example, the email could be sent in a CSV format like this:
Evolutivo is awesome,Evolutivo srl,info@evolutivo.it,999099099,Inicio rápido con AI,Tecnología,Automatización de procesos.,Inicio rápido con AIWith that format, we create a mail converter configuration like this:
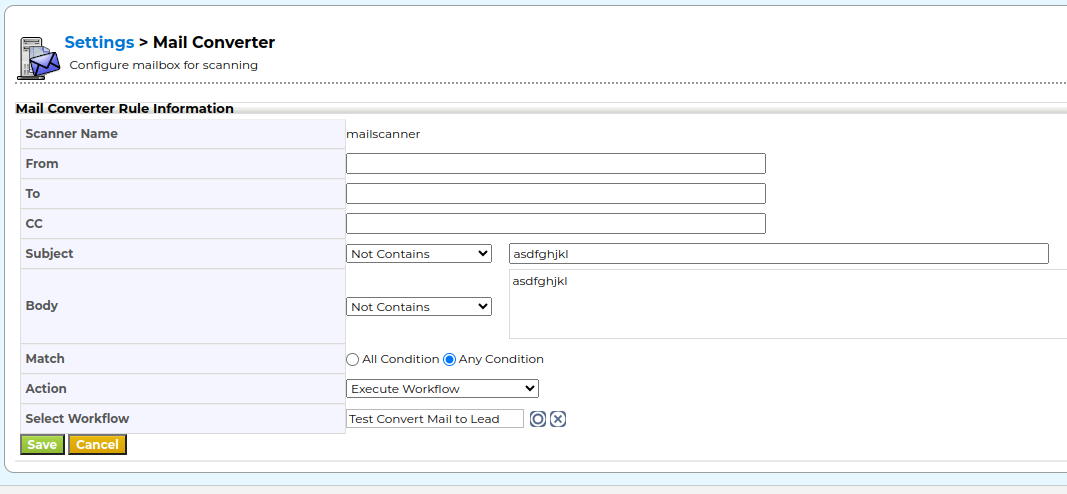
and the workflow looks like this
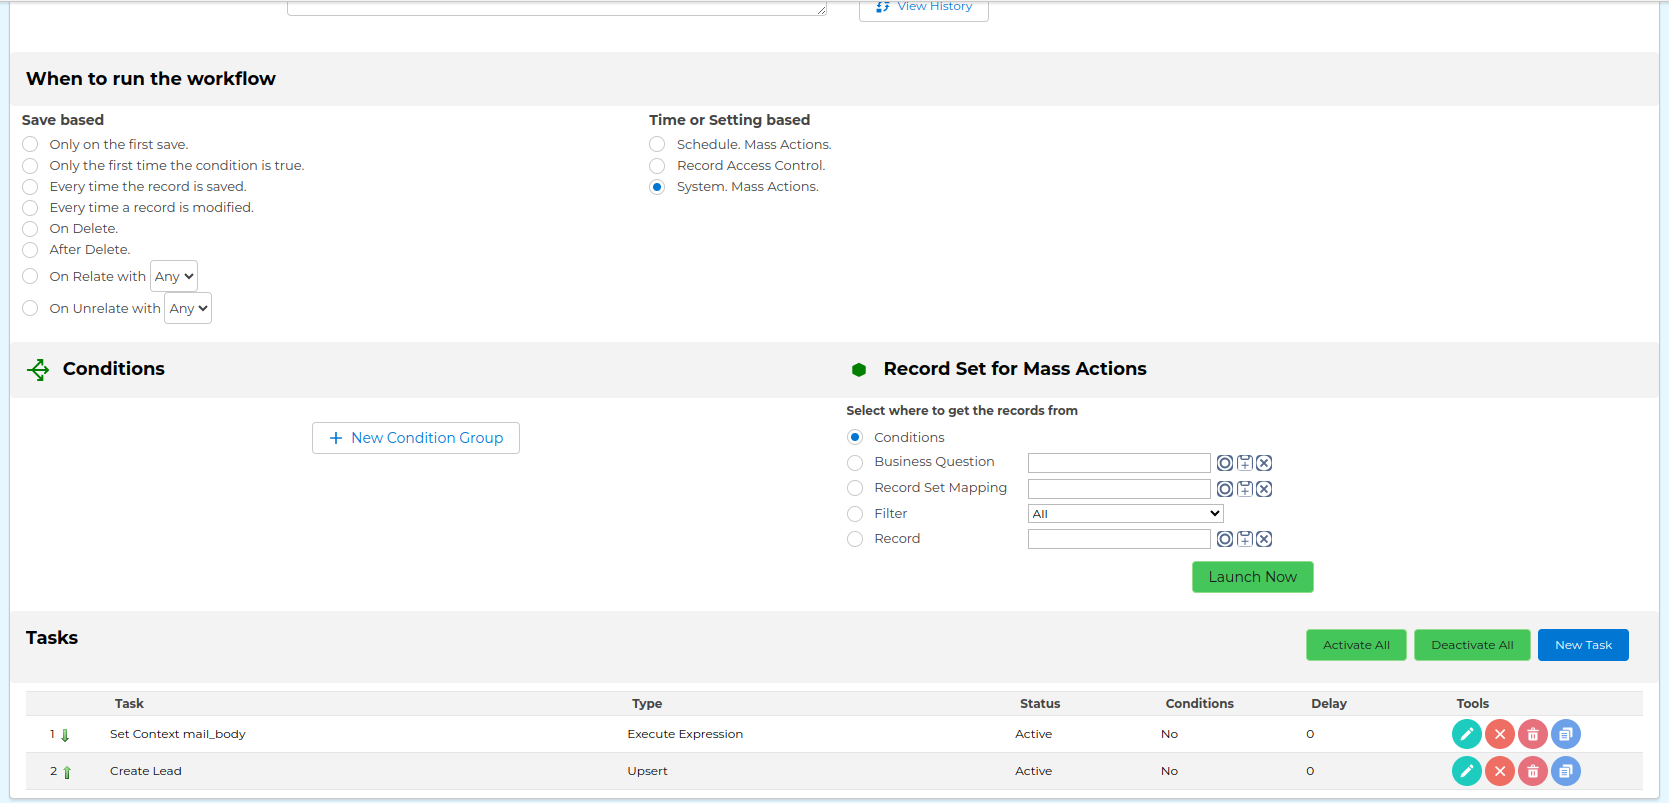
where you can see that we trigger the workflow from the mail converter. The workflow is set as a "System. Mass Action", this means that it will never be triggered by the workflow system, it must be launched by some external process. In this case, that external process is the mail converter. The mail converter will create a Message record and launch the workflow with the ID and context of this message. This means that the workflow MUST start from the Message module.
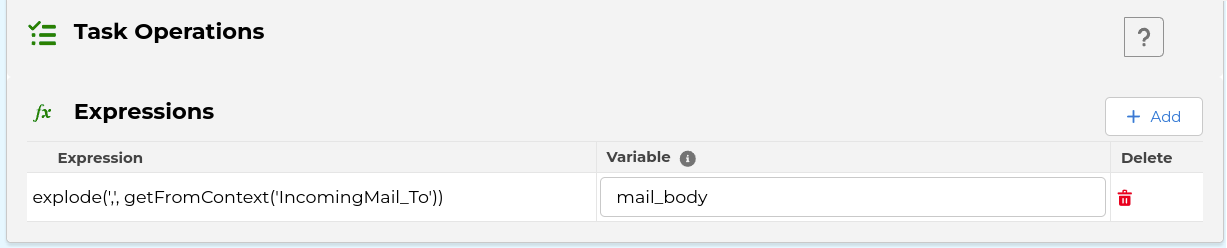
Once it is triggered, we have two tasks. The first one processes the body of the email, converting the CSV into an array and injecting that array into the context so each field can be used in the next task which will create the lead with those values:
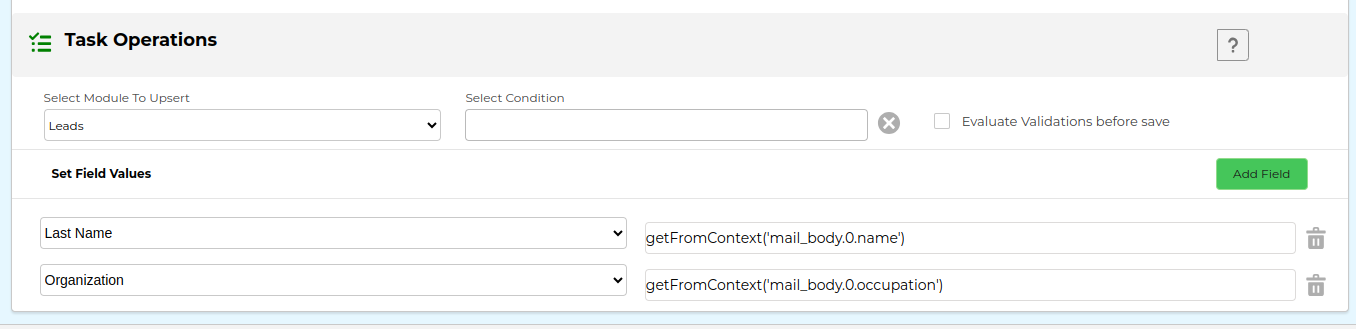
The Lead record looks like this:
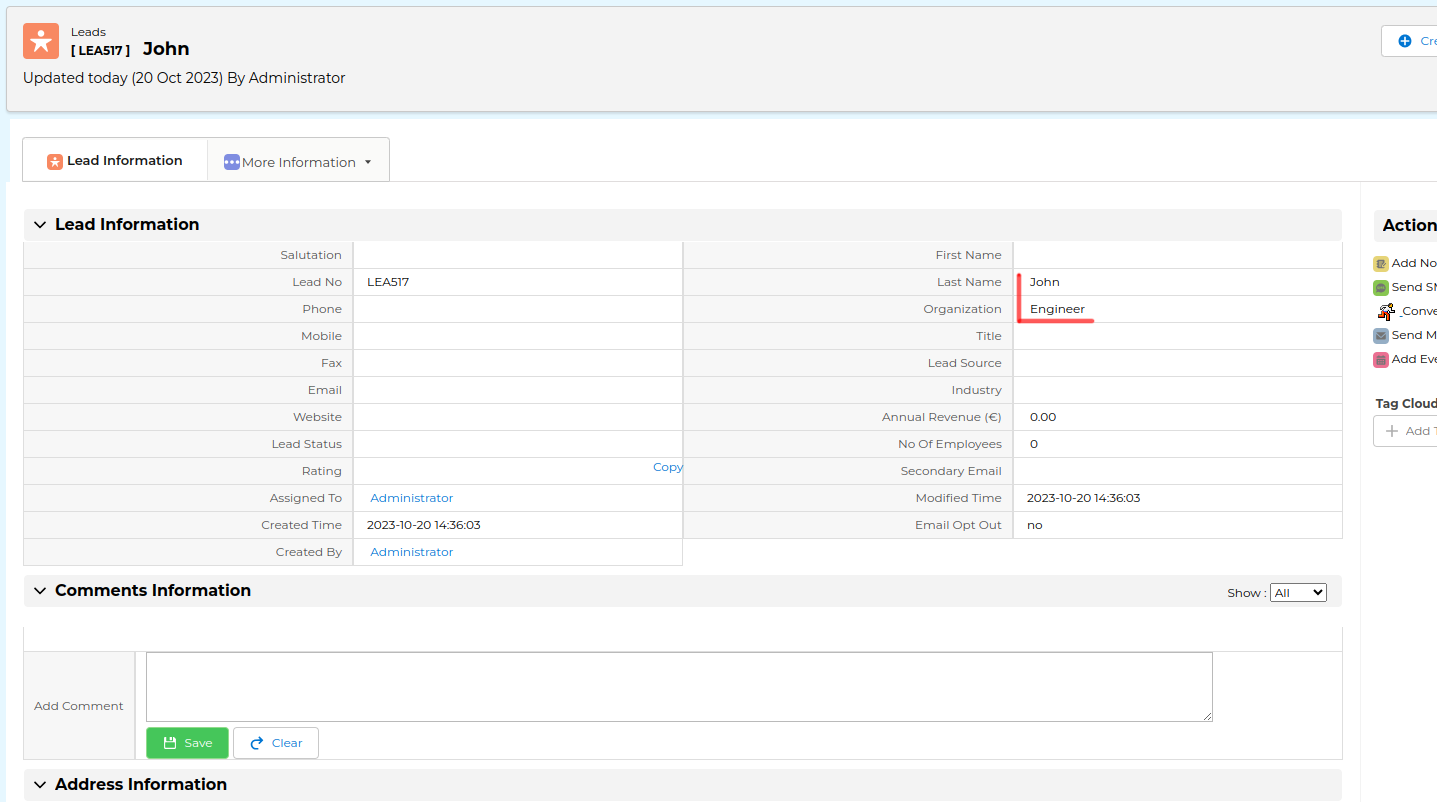
This approach allows for the creation of any record with various types of email content. For example, in our CRM and sales process definition, a person who fills out a form on your website is considered a Contact, not a Lead. Leads are individuals whose interest in your product is unknown, while Contacts have expressed interest. A person browsing your website and filling in a form there is not a Lead. In this case, we convert the email into a Contact and a Potential record to initiate the sales process. This involves two Upsert tasks, one to create the Contact and the other to create the Potential using the Contact's information to relate the two records.
One final note. As you can see in the upsert task we read the values of the email by "position", mail_body.0. That "0" represents the first field of the CSV. While we were configuring and testing this procedure we decided to add a new function to the workflow expression language: CSVtoArray. This function will read a full CSV (with more than one row) and return an array that can indexed per the header row (the first row). So if we receive an email with this body content:
Name,Age,Country,Occupation,Salary
John,30,USA,Engineer,80000
Alice,25,Canada,Teacher,60000
Bob,35,UK,Doctor,100000
Eva,28,Germany,Designer,75000
Michael,40,Australia,Manager,90000
and use this expression:

We will be able to access the CSV elements like this:
getFromContext('mail_body.0.name)> JohngetFromContext('mail_body.0.occupation)> EngineergetFromContext('mail_body.2.country)> UK
A special thanks to Arlind who helped configure and test this part, and created the new workflow expression.
Program it
The next option is to program it yourself. I don't recommend this option but I have seen it done in some installs. In the end that is the power of open source, the code is there, so you can see it and construct on top of it to add any functionality you need, so you can create your own endpoint that will receive the email or direct form submission, process it however you need and create and/or update whatever you need in the application.
With great power comes great responsibility.
External tools
A slight variation on the above options is to use automation tools like Make or N8N, reading the email and processing it there and then sending it to one of the endpoints constructed with the previous options. This approach can simplify email processing workflows at a cost.
Mautic!
If you can, I would recommend the Mautic Integration. Not only will you be able to easily create web forms that will create entities in your EvolutivoFW application but all the other functionality that Mautic brings to the table for automating and tracking your leads.
Conclusion
EvolutivoFW offers a variety of tools and extensions to streamline lead generation and management processes. The choice of which option to use depends on your specific needs, technical knowledge, and security considerations. By selecting the right method for your business, you can enhance efficiency and better manage leads and information requests.
Don't hesitate to explore the related resources mentioned in this post for further insights and updates. If you have any questions or need assistance with any of these options, feel free to reach out to our support team. Streamlining your lead management process can significantly impact your business's success, so make the most of these capabilities.
Let me know if I forgot any options!
Related Stuff
